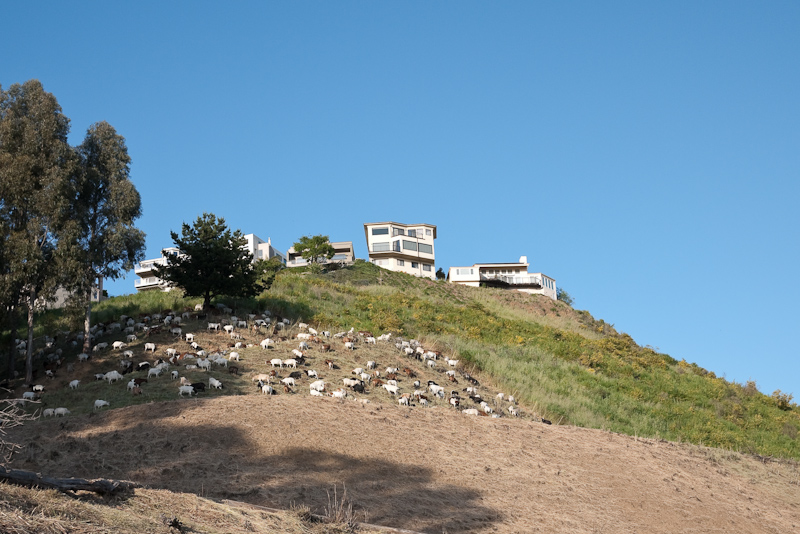
seeing a hillside crowded with goats was an unexpected part of yesterday’s bike ride. I didn’t realize until it was pointed out to me later that they were being used to remove grass and weeds for fire control purposes.
goats chomping down
you can see a clear line between chomped and unchomped areas. wow!
apparently there can be problems with the goats being too effective – they can cause soil erosion and can decimate the population of native plants if the goats are uncontrolled.
Other interesting things I found while searching the interwebs:
A friend of mine recently came across some M42 lenses that were being tossed out. He passed them along to me, thinking they might be of use. (Thanks Jesse!) In the box were a pentax takumar 35mm f/3.5 and a 135mm f/3.5. I’ve spoiled myself with fast primes for my cameras, so this is a bit of a departure from what I’d normally use. It’s a 70mm focal length equivalent with the 2x m4/3 multiplier.
I used my M42/C-mount to micro four-thirds adapter with a 9mm and 16mm extension tube to get the flange back distance to match that of a 35mm lens.
Photos of the takumar 35mm f/3.5 on the GF1:
takumar 35mm f/3.5 on the GF1 three quarters viewtakumar 35mm f/3.5 on the GF1 front viewtakumar 35mm f/3.5 on the GF1 side view
The lens works alright on the camera. It’s not nearly as bulky as the 8mm peleng fisheye. Focusing worked fine and the manual focus magnification helps a lot. With longer lenses (I tried the 135mm f/3.5 for a bit), I’ve noticed that the magnification isn’t very useful because of camera shake.
Photos with the 35mm lens look fine. The effective focal length worked pretty decently. Here are some samples:
OSH water tower, takumar 35mm f/3.5 on a GF1 (@f/3.5)OSH water tower, takumar 35mm f/3.5 on a GF1 (@f/3.5)dodge in west berkeley, takumar 35mm f/3.5 on a GF1 (@f/3.5)
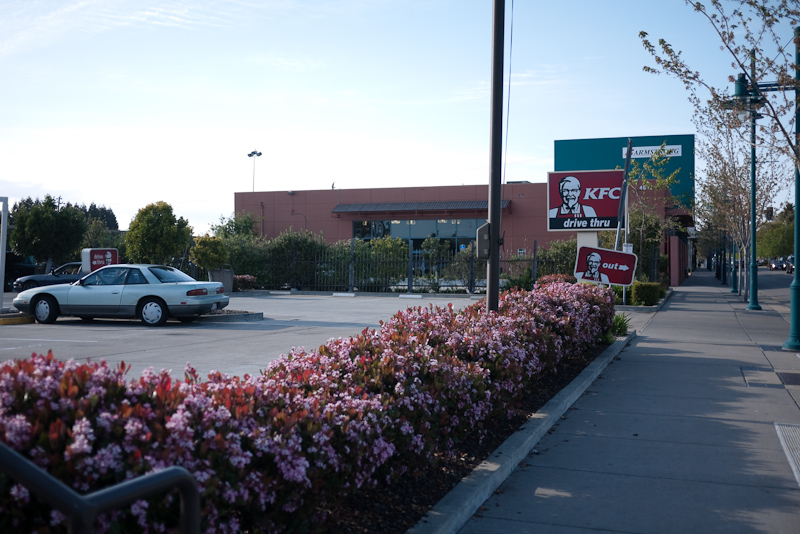
We went to the KFC on 45th and San Pablo in Oakland:
kentucky fried chicken@45th+san pablo
We ordered our sandwiches and inspected them. Mine didn’t look as “disgusting” to me as some reviewers (also check out a little side story here) have described:
kfc double down
but it didn’t look too good either. It tasted super salty, and the flavoring on the chicken totally overwhelmed everything else in the “sandwich” (rox informs me that according to MW, it’s not a sandwich, but a “sandwich” because there is no bread to be found). you could make out a little bit of the cheese via texture and if you tried, you could taste the “colonel’s sauce”. It didn’t taste horrible though. The bacon probably wasn’t necessary – I could hardly tell it was there. I was scared that I’d get sick. but I didn’t.
My friend Israel didn’t have much to say. He just shook his head.
We also got 2 biscuits for 99 cents. Israel got honey and butter to put on the biscuits, but it was actually “buttery spread” and “honey sauce”. 11% real honey!
biscuits with butter and honey?no! buttery spread and honey sauce!
I saw these three guys walk in.
3 hipsters walk into a kfc
(note: Israel made the astute observation that their menu is basically only combos – no individual sandwiches. Perhaps the margins are just that much higher on the combo meals?)
They were definitely getting double downs – you could tell by their pants and their fixed gear bikes.
fixies three. no brakes = combo meal.
and they did. I can’t blame them though because they were there for the same reason that we were.
That seems like a decent idea. I like having a garment bag because the shirt and pants aren’t as folded as tightly (I have the eagle creek folder as well). That’s just my personal preference though. The difference in wrinkling probably isn’t that big.
The Jandd bag looks like a viable alternative.. It’s a little pricey at $225 and shares a similar mounting system to the nashbar pannier. But it’s something I’d definitely check out when I decide to replace this bag. (James in Denver, who has also used the nashbar pannier wrote his own review of the jandd: http://onelessindenver.blogspot.com/2009/08/review-jandd-commuter-garment-bag.html)
This is a new product out of Vancouver that is catching on. This one gets everything to work wrinkle free every time.
One of the things I love about this bag too is that it is easy to carry once you get to your destination.
The reason why it is fine to have this as a backpack instead of a panier is that you change as soon as you get there anyways so who cares if your back gets sweaty.
This also looks kind of cool and has compartments for shoes and other accessories. I’d prefer a pannier because it’d be easier on my back but it’s nice to have this as an alternative as well.
Nashbar garment bag pannier review
nashbar garment bag pannier
I bought this garment bag pannier in October of 2008 when I decided that I wanted to commute by bike to work instead of taking the bus. I’ve been using it now for about a year and a half and figured it’d be useful to put a review out onto the interwebs. It’s gotten a good amount of use: I’d guess that at a rate of about 4 days per week for about a year and a half, that’s about 280 uses. With a relatively short 6-mile round-trip commute, that’s about 1680 miles of use.
This bag was the cheapest one that I could find at the time. I saw it at nashbar.com and also in-store at performance bike. They’re basically the same product. The only difference is that the performance bag has the “Trans-it” logo sewn on.
loading the bag onto your bike rack:
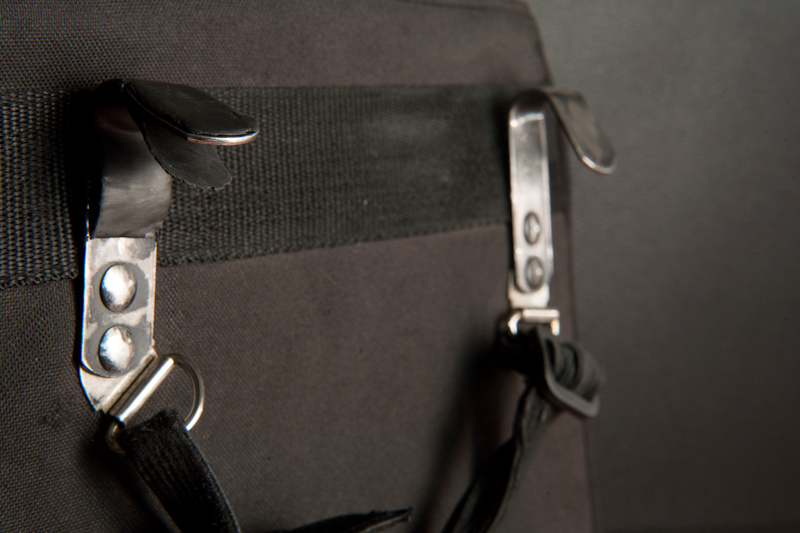
Loading the bag is a little tough. The hooks are metal, covered with a soft vinyl-like plastic. this plastic wears away pretty quickly and you’ll end up scratching up your rack. this isn’t too big of a deal, but the hooks definitely aren’t as nice as, say an ortlieb pannier with the quick release system and a more secure mounting.
nashbar garment bag: top hooks, worn.
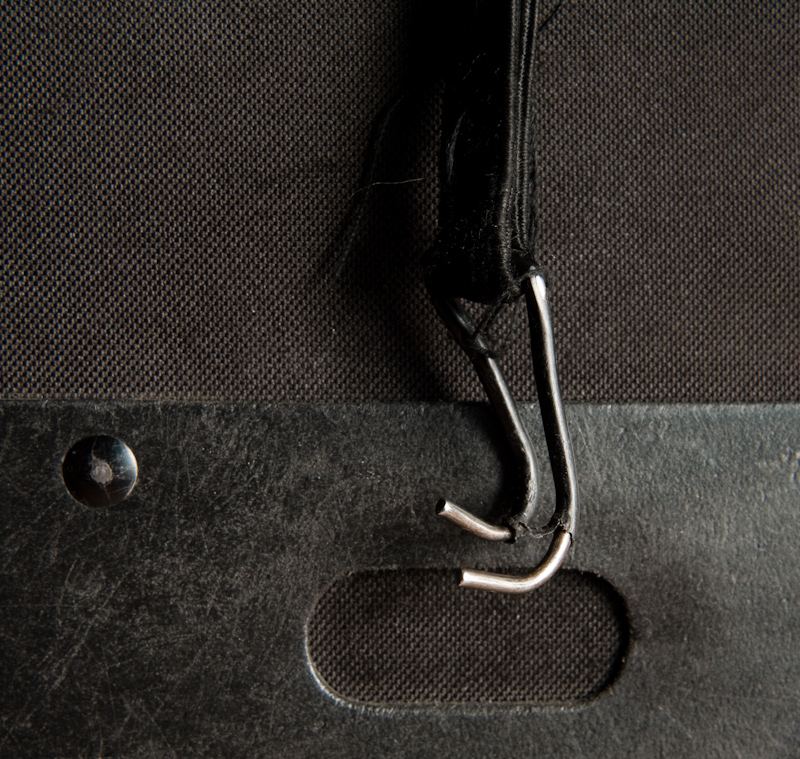
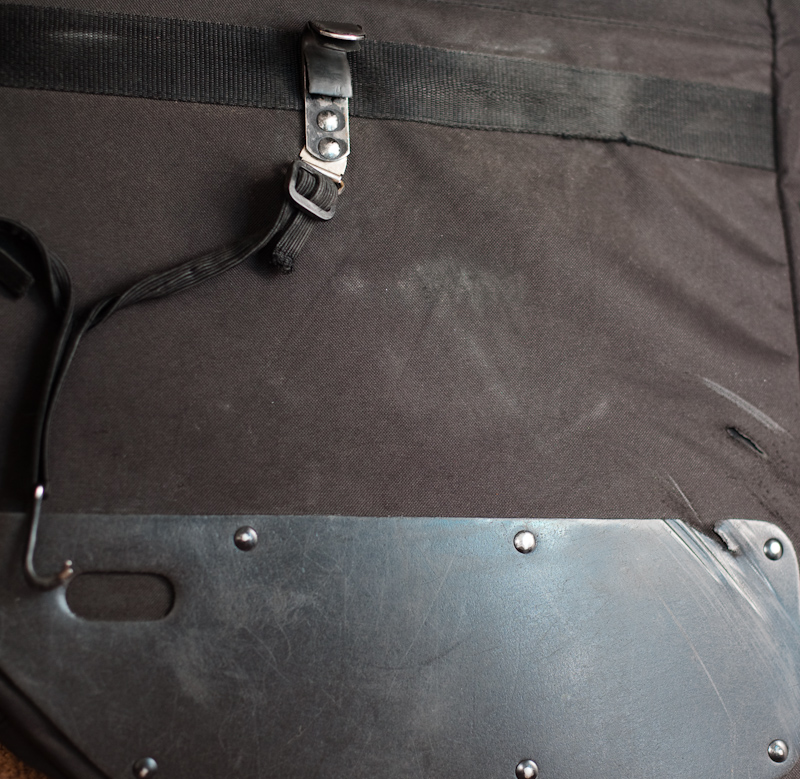
the bag is secured to the bottom of your rack with a stretchy elastic cord and another set of plastic-coated metal hooks. I’ve found that the plastic on these hooks wears away pretty quickly as well. You can also really hurt yourself with these. the elastic cord can generate a lot of tension, and if these hooks go flying when you unlatch them from the bottom of your rack, you can cut your fingers or hand. It’s happened to me a couple of times. The hooks also get caught on just about everything when you remove the bag. These hooks can also fall off of the elastic cord and get lost (see the photo below)
nashbar garment bag bottom hooks: slightly dangerous.
There’s a hole in the hard plastic for stowing the hooks, but it doesn’t work so well in practice for me. This hole is higher than where I attach the bottom hooks to my bike rack and there isn’t enough tension in the elastic cord to keep the hooks engaged.
There are two more clips that secure the bag even more on the front of the bag and the rear of the bag. I’ve found that they’re very helpful in securing the bag.
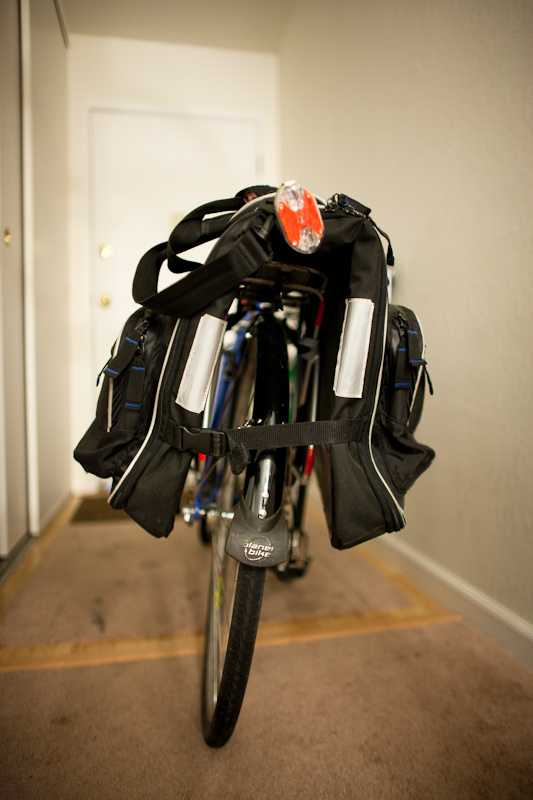
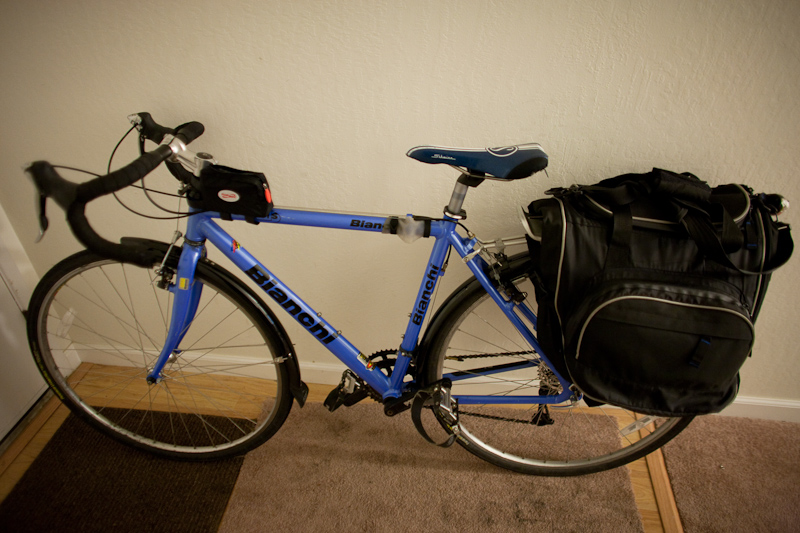
on the bike:
nashbar garment bag: on the bike, rear view
nashbar garment bag: on the bike, side view
Riding with the bag is usually not bad at all. It’s well balanced (in a side-to-side sense – the bike+bag is of course top-heavy, so it’s hard to keep upright when you’re not riding) because it covers both sides of the rack. I had a lot of problems when I first started using the bag with parts of the bag rubbing against the tire. One time, one of the hooks came off and got caught on a spoke. after a couple of revolutions, it locked up my rear wheel and my bike skidded to a stop. scary.
There’s hard plastic on the insides of the bag (facing either side of the rear tire when mounted) . This seems to help prevent water and grit from soaking the inside of your bag when it’s raining. It also serves as abrasion protection if somehow the inside of your bag rubs against your tire. tire rub is of course rack-dependent.
nashbar garment bag: tire rub on the inner side of the bag. It's not in focus here, but the bottom hooks on this side have been sharpened by many cycles on loading and unloading the bag. kind of dangerous!
I have to make sure that I place the bag far enough back on the rack so that the clasp doesn’t rub against the back of the rear tire. This also helps prevent your heel from hitting the bag when you pedal.
the two clips prevent the sides of the bag from bouncing around too much if you hit a bump. the back clip’s gotten a little frayed from rubbing against the rear wheel from times when I’ve been sloppy in placing the bag onto the rack.
The bag has two reflective strips on the back side. There’s also reflective piping around the side and top pockets. I’m not sure how visible it is, but I think it is a good thing to have. I put a makeshift tail light into the carrying handle on the top of the bag. it seems to work.
nashbar garment bag: reflective strips and piping. Also note the clip for keeping the two sides close to the wheel.
unloading:
Sometimes unloading the bag is a breeze – you just unhook the bottom hooks and pull straight up. Sometimes it sucks a lot – the hooks can stubbornly attach themselves to your back rack (I mentioned getting cut on them above!) and then they can catch onto just about EVERY part of your back rack as you lift the bag from the rack.
The fact that this bag is attached to both sides of your rack makes it a little harder remove the bag. If you’re using just a regular (single sided) pannier, you can lean the opposite side of your bike against something. that doesn’t work so well in this case.
carrying it while walking:
the bag’s generally pretty heavy and bulky when loaded, so it sucks a bit to carry while walking. I bought a crumpler velcro shoulder pad (item SP01A) to help distribute the load in a more comfortable way.
It’s kind of big, so it might bump against your legs as you walk as any other bag this size would.
how does the bag carry your clothes?
I’m pretty happy with how the bag carries your clothes. Typically, I can fit in a shirt, slacks and shoes into the bag. It’s a bit smaller than other garment bags I’ve used (but of course, those bags don’t mount onto your bike..) so there’s a bit of folding that you have to do to get your pants and shirt to fit. My shirts get to work with a couple of wrinkles, but it’s not nearly bad enough for me to care.
nashbar garment bag: open and loaded
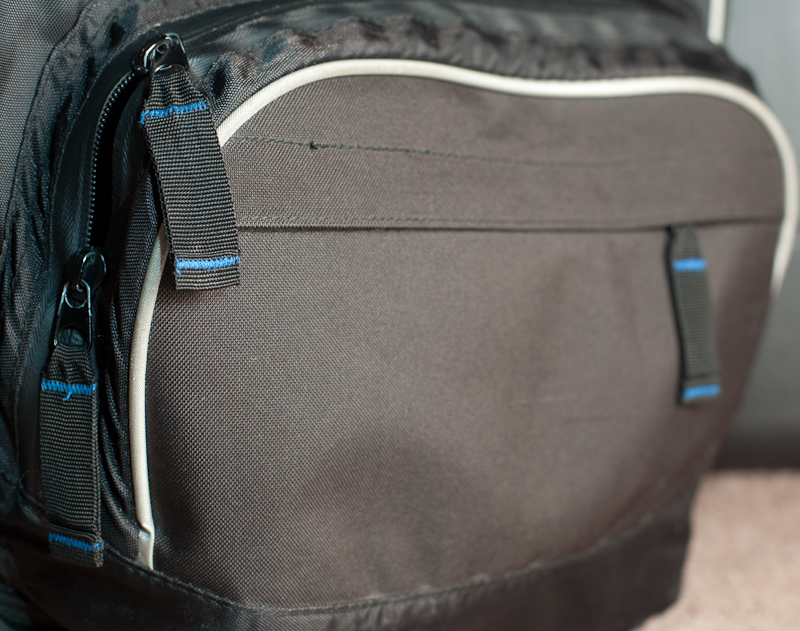
There are two side pockets on the outside of the bag, each with a smaller separate compartment for fitting even more stuff. Each side pocket can fit about 3 bottles of beer. (though if you do choose to load your pockets this way, your bag will be considerably harder to carry) There’s also a pocket on top that I probably underutilize.
nashbar garment bag: side pockets
If you’ve got clothes already in your bag, there’s not too much more carrying capacity. I typically have tools and a bike lock in one side pocket and lunch or other miscellany on the other side pocket. You can stuff more things into the main compartment, but after a certain point, it gets hard to fold the bag over onto your rack.
in the rain:
The bag’s not bad in the rain. Some parts of the bag have a waterproof inner coating, but other parts (especially near the zipper of the main compartment) don’t. In mild rain, nothing inside gets wet. When it’s raining heavily, though, I can expect parts of my shirt and pants to get wet. Overall, it’s decent.
general comments on build quality:
the bag feels kind of cheap. I think the mounting system kind of sucks. I’ve used other nashbar bags that use the same mounting system, and I dislike those as well. I’ve found that you can use a carabiner or something similar (google search: “oval screw link”) in place of the bottom hooks. this prevents injury and also doesn’t catch on as much as you remove the bag. I haven’t “upgraded” my bag yet, but I really should.
price/value:
As of today, the bag is selling for $59.99 at nashbar.com. It’s performance bike equivalent is $99.99. That’s $40 extra for the “Trans-it” brand (which in my mind doesn’t hold much equity). I think I paid $79.99 for it in 2008. It was an okay deal for what I paid, probably a good deal for $59.99 despite its shortcomings. It’s significantly cheaper than similar products:
knog neat dog rackless pannier (about $140 according to google shopping, and it gets kind of bad reviews)
two wheel gear bag ($150 on their website, www.twowheelgear.com, not sure how well-received it is)
overall thoughts:
I don’t really enjoy using it, but I use the bag nearly every weekday out of necessity. It does its job without too many problems. The main problems are the annoyances in loading and unloading the bag and the fact that walking around with the bag is awkward. It’s a good value at its current price on nashbar, but if you’ve more money to spend, I’d recommend finding something where more attention has been paid to ease of use and quality in general. I’ll probably upgrade at some point, but I haven’t found another bag that serves the same purpose at a better level of quality.
I went for a cold and sometimes wet ride up mount tamalpais today. It was my first time riding up there and back. I thought the fog looked great, though I’m sure the view would have been amazing on a clearer day.
mt. tam in the fog.
I treated myself to an affogato when I got home (and a sausage and beer at rosamunde/toronado before that):